WHAT YOU NEED TO KNOW ABOUT WEDDING INVITATIONS
WEDDING
what you need to know about wedding invitations
When planning a wedding, one of the key elements is deciding on an invitation. They have the power to set the tone for the entire event.
Your invitations are so much more than a list of information. They should visually capture your wedding theme, colour palette and communicate to guests what type of event they are being invited to.
Save the Dates
You can send out a paper ‘save the date’ that matches your wedding stationary or you can save time and money by sending out an e-vite using a site like paperless post. I made a custom design that I uploaded to the site that matched our wedding theme and invitation design.
The invitation
Your wedding invitation should include the following:
the couple’s names
their parents names (if they’re paying for the event)
the wedding location, date and ceremony time
any events following the ceremony such as a dinner and dance.
the location of the post ceremony celebrations
if you’re using calligraphy make sure it’s legible enough for your guests to read.
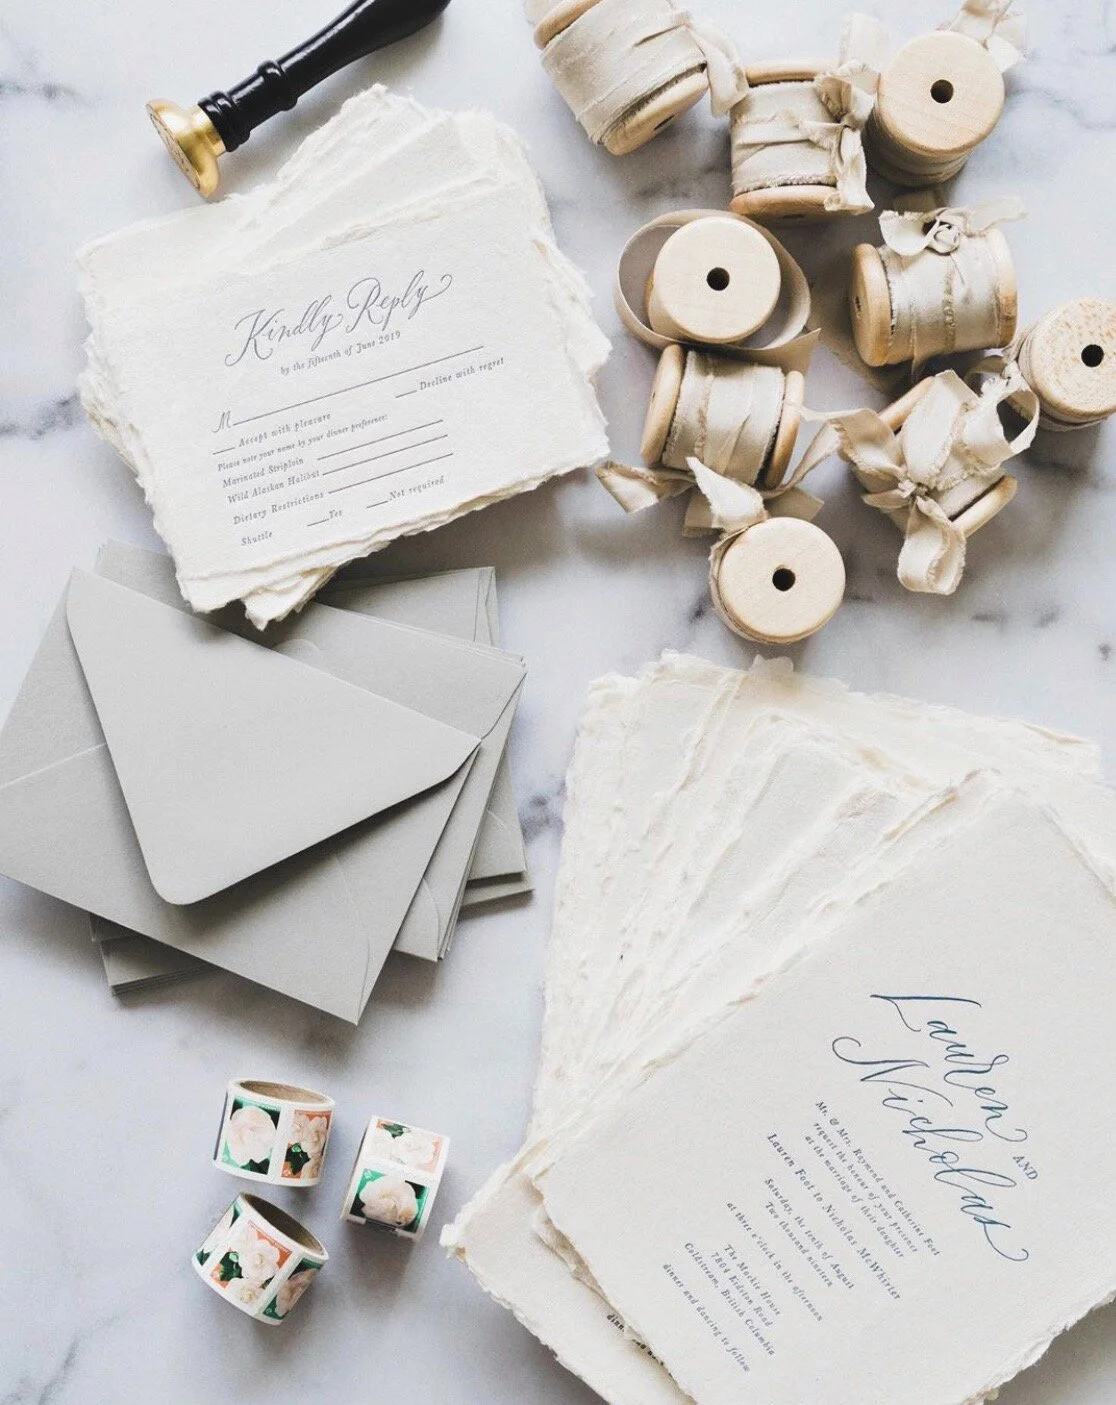
this is how ours read:
Lauren and Nicholas
Mr. and Mrs. Raymond and Catherine Foot request the honor
of your presence at the marriage of their daughter
Lauren Foot to Nicholas McWhirter
Saturday the tenth of August
Two thousand nineteen
at 3 o’clock in the afternoon
The Mackie House
7804 Kidston Road
Coldstream, British Columbia
dinner and dancing to follow
the rsvp
This can be done digitally by adding a website link on your invitations or it can be done in a more traditional way by sending an additional sheet of paper with a pre-stamped return envelope.
What should be included:
a reply date
a space for the guest to write their name so you know the RSVP belongs to.
An option to accept or decline the invitation.
If you’re having a plated dinner include the dinner options and allow them to select which item they want.
a space for them to write any dietary restrictions or special requests.
If you’re providing transportation, supply an option to check ‘yes’ or ‘no’ to provided transportation.
a reply envelope, pre-stamped and addressed (back to you).
A MAP (optional)
Including a map (often offered by your calligrapher or designer) is a nice touch, but it’s not necessary.
If you do include a map some locations you may want to highlight:
ceremony venue
reception venue
airport
hotels where you’ve created room blocks
ADDITIONAL INFORMATION
If you have any additional information for your guests regarding, wedding weekend celebrations, shuttles, room blocks, wedding registry, wedding website link…etc. You can put that information on a separate card or email it out to your guests.
THE MAIN ENVELOPE
First you need to collect the addresses of all of your guests, if you’re sending digital invitations you need emails.
You should only need to send one invitation per family or per couple.
Make sure to use the proper stamps for the weight of your envelope. If you’re using a wax seal or have a heavier envelope you’ll need a more expensive postage stamp. Take your invitation to the post office and ask them what you need before you purchase them.
You can buy 100 stamps at Costco at a great price.
Make sure to use American stamps if you are sending cards to the USA. This goes for any other country.
design
We had ours written in Calligraphy but you can get them done with letterpress, digital printing or handwrite them yourself.
You’ll also want to decide on how you want to write everyone’s names out. I wanted to have Mr,, Miss, Mrs…etc. on our invites but I am a bit of a feminist so I had both the men and women’s first names written on the envelope but we went with his formula:
Mr. Raymond and Mrs. Catherine Foot
and for families:
Mr. Raymond and Mrs. Catherine Foot and family.
closures
Wax seals are a really nice touch if you have a higher budget for your invitations. We ordered a creamy white wax and used a custom designed wax seal stamp which we ordered from artisaire.
RETURN ADDRESSES
You an write these on the back yourself
You can have your calligrapher write them on the back
You can get them printed on
You can get them letter-pressed on.
We had ours made into a stamp through B.C. Stamps. They turn around stamps in 24 hours which is incredible. All you need to do is give them a pdf, ai or jpg file. We were so lucky that our super talented calligrapher gave us our invitation logo of our names to use for the top of the return. Because it was stamp ink we didn’t have as many options so I chose to go with white so it would be the most subtle.
getting inspired
I am a graphic designer so I put a lot of thought into the design of our invitations. I looked to instagram and Pinterest for inspiration and that’s actually how I found our calligrapher @HelloMaurelle’s.
We decided on handmade paper, with silk ribbon from @stellaandwolfe.
As for the colour palette, we went with white handmade paper, dove grey envelopes, a creamy tan silk and creamy white wax seal stamp.
To view my pinterest inspiration board click here
